How To Clean A Toaster? [Step By Step Guide]
Howdy Everyone, Toasters are fantastic pieces of household appliances, simple to use, and making toast is as easy as pressing one button. Nevertheless, there are some things you need to know before you start maintaining your toaster or replacing the toaster. What to look out for? Toasters are simple devices, however, they have a rather complicated operation behind them.
The physical part of the toaster is relatively simple; it consists of a metal cylinder with holes in it, through which a hot plate is placed. Then the toaster oven itself consists of two parts. First the “bread” hook, and second the “oven.” You can buy toasters with a thermometer inside, that measures the internal temperature of the bread, but, in most cases, the toaster will provide this function automatically.
Contents
Unplug And Cool
First, unplug the toaster. If you have a self-clean cycle, unplug it then open the toaster, inspect for any damage to the oven-microwave door or the cord. To clean the oven, unscrew it and dust it with a microfiber cloth. For the microwave, you will need to remove the grease liner and wipe out any dust from the inside.
Step 1:- Ensure the seat is clean Second, ensure the toaster seat is clean. If you have a self-clean cycle, unplug the toaster, open it, and spray it with the cleaner from the top. If you do not have a self-clean cycle, use a damp cloth dipped in warm soapy water to wipe the toaster seat.
Step 2:- Check that the electronics are still in good working condition Third, make sure the toaster still works. If you push down on the bread plate it should move a bit.
Remove Crumbs
Take the crumbs from the area of the toaster that heats the bread. They should stick to the heating element inside. If they’re stuck on a piece of bread or foil, you can pop it back into the toaster to clean off crumbs.
Step 1:– How to clean the heating element: For toasters with hard heating elements, these will need to be cleaned with a soft bristle brush or toothbrush. For toasters with soft heating elements, these are often softer and can be pushed against the heating element and cleaned off easily with a microfibre cloth.
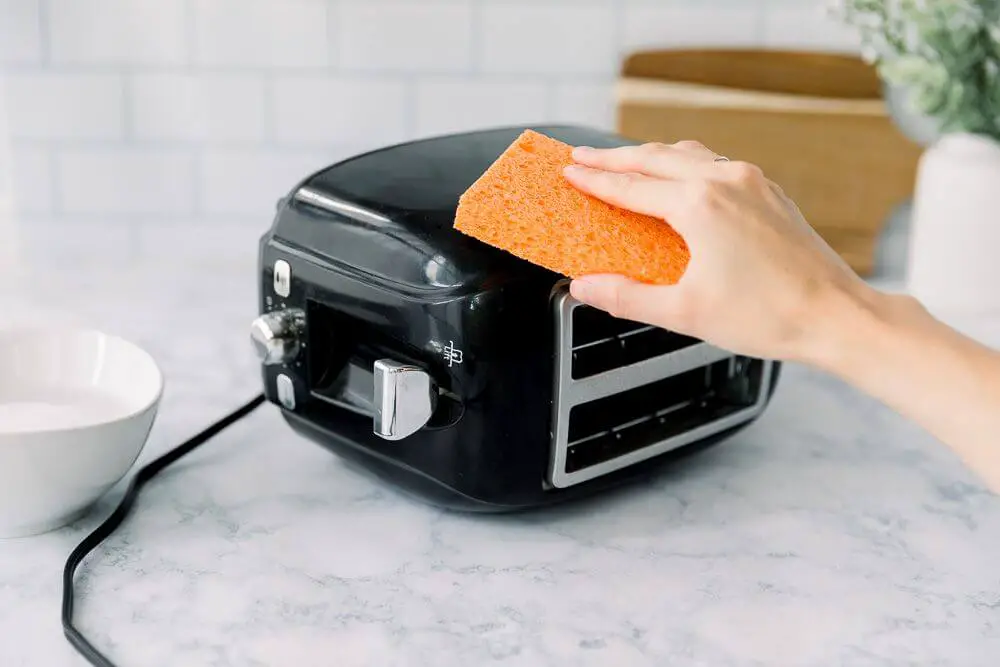
Step 2:- How to clean the exterior of the toaster: The outer casing of the toaster can get fairly smelly. The easiest way to clean it is with baking soda, but we’ve heard that a solution of dishwashing liquid and vinegar can help as well.
Clean The Exterior
The outside of the toaster should be cleaned every two to three months depending on the size of the toaster. If you can see the inside of the toaster you have a serious problem and you should buy a new toaster. You can’t expect a professional to give you a quick diagnosis and they will most likely recommend replacing the toaster.
Step 1:- Expose the internal surfaces of the toaster In order to clean the inner workings of the toaster you have to let it cool down. Once the outer casing has reached room temperature the toaster is ready to be cleaned. Scrub with a non-scalding cleaning liquid Most cleaning products for toasters are non-scalding, so they can be used on the inner surfaces of the appliance.
Clean The Interior
Before you attempt to take the toaster apart, the first thing you should do is clean the interior and inside the casing of the toaster. There are a couple of things you can do to make your toaster more effective: – Use different cotton rags that are smaller than the circumference of the toaster to remove the food that falls into the toaster. – If the toaster has a wire rack, use a paper towel and a stick to remove the foods that fall into the wire rack. – Make sure to inspect the internal parts of the toaster as well. You should check for cracked, crusted, or rusty parts and replace them as necessary.
Step 1:- How To Clean And Maintain A Toaster: A Simple Guide – Replace the coils Before you attempt to take the toaster apart, the first thing you should do is replace the coils.
Conclusion
This article has provided you with a good basic understanding of how to clean your toaster and its components. You can now take it as a guide and follow it to perform a simple, yet necessary, cleaning routine on your toaster and continue using it. We hope that you found this article on how to clean and maintain a toaster useful. As we keep bringing you the best articles, you can stay ahead of the curve and enjoy the best user experience and peace of mind that only comes with doing the right thing.
You May Also Like This!
- OSTER Red 2-Slice Toaster Review
- Sunbeam Wide Slot 4-Slice Toaster
- Top 5 Best Toasters To Buy
- GASTRORAG 2 Slice Toaster Review
- Top 5 Cheap Toaster Under $30
- Top 5 Best American Made Toasters
I hope you will like this our today’s topic (how to clean a toaster?). If you like share this article with your friends, families, and needy ones. And write a comment about which topic you want next. Thanks For Reading…
Must Visit To Our Website:- www.verybestkitchen.com
Must Join To Our Facebook Page- Very Best Kitchen
Thank You Everyone & (Happy Shopping)🛒